


Table of contents
Introduction
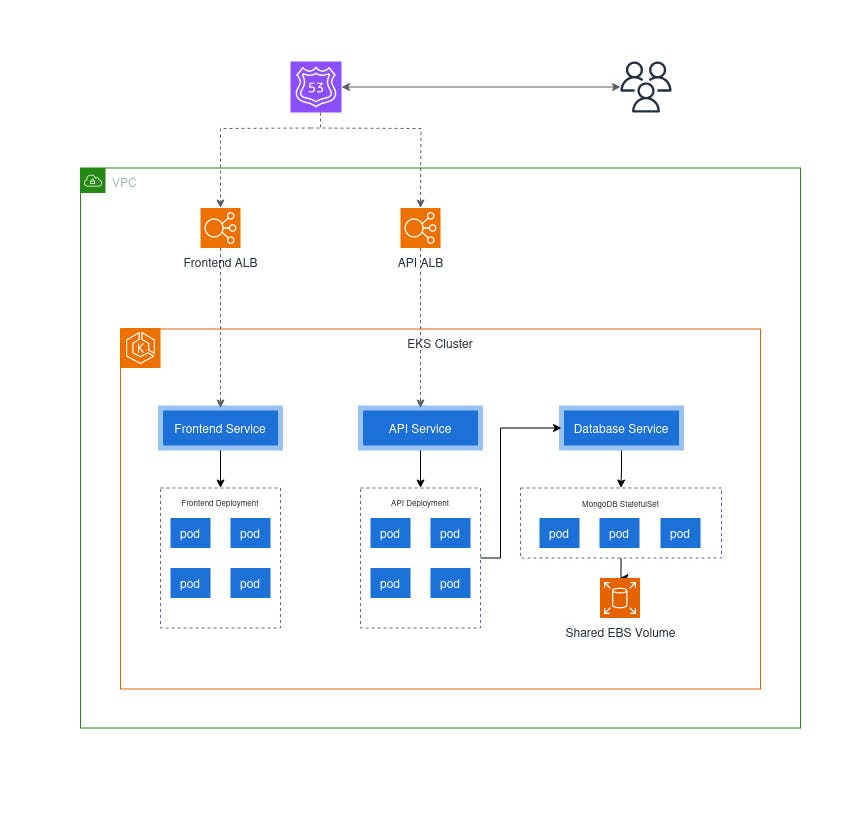
In this tutorial, we will deploy a full-stack application to an Amazon EKS cluster. This is a voting application made up of a React front end, Go API and MongoDB database. We'll use Kubernetes(k8s) resources such as; Services, Deployments, Secrets, and StatefulSets. Below is the architecture diagram for this project:
This project was inspired by a YouTube channel called Cloud Champ, you can watch their full video tutorial here: https://youtu.be/pTmIoKUeU-A?si=lZ3ev7Fgyqcw-7yI
Prerequisites
To follow along with this project, you will need the following items:
An AWS Account
AWS CLI installed locally and configured with an IAM user
Kubectl CLI tool for k8s
Git
And a text editor (VS Code)
N/B: In order not to run into complicated issues, I highly recommend using the same IAM user in your AWS console and AWS CLI to do this project. Because when you create an EKS cluster, only the user who created the cluster can access it by default. So if you created the cluster with your root user account and are signed into a different IAM user in your AWS CLI, you will have trouble running commands against your cluster.
Procedure
Creating the IAM roles
We need two IAM roles, one for the EKS Cluster and the other for the EKS Nodegroup. To create the an IAM role for the EKS cluster, you can follow this tutorial from the official AWS Documention https://docs.aws.amazon.com/eks/latest/userguide/service_IAM_role.html#create-service-role.
Similarly, you can follow this tutorial from the AWS documentation to create an IAM role for the EKS nodegroup: https://docs.aws.amazon.com/eks/latest/userguide/create-node-role.html#create-worker-node-role. You also need to make sure you add the following policies to your IAM role:
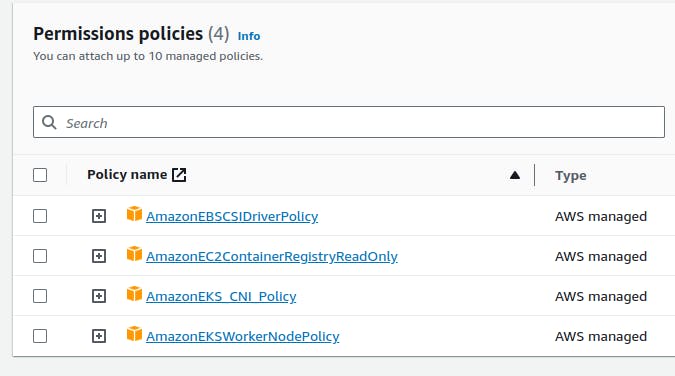
This step is very important.
Creating the EKS Cluster
In your AWS Console, search for the EKS service and create a new cluster. For this cluster, you can use the default VPC and Security Groups. The only options you have to provide are:
The Cluster Name
And the EKS Cluster role we created earlier
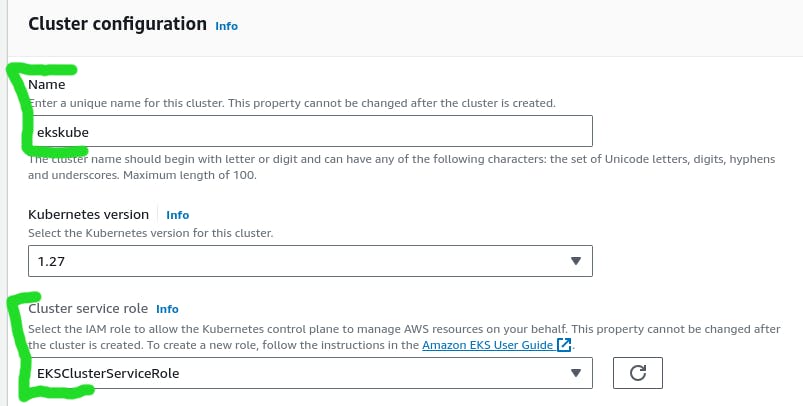
All the other options can be left as default and you can go ahead and create the cluster.
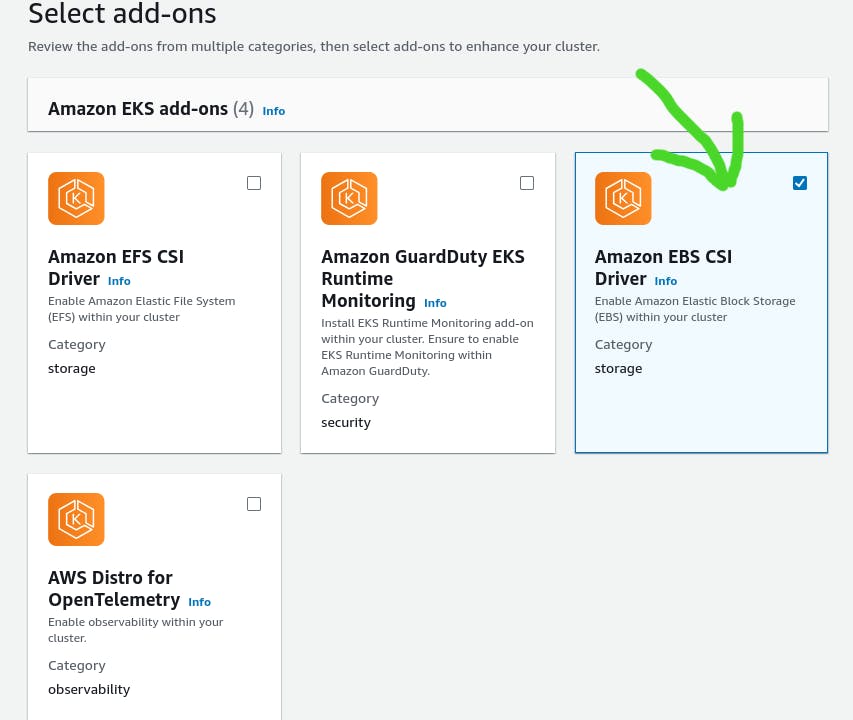
Installing the EBS CSI Driver
We will be using an EBS volume to persist the data in our MongoDB database, and for this we need to install the EBS CSI driver.
In your cluster, head over to Add-ons
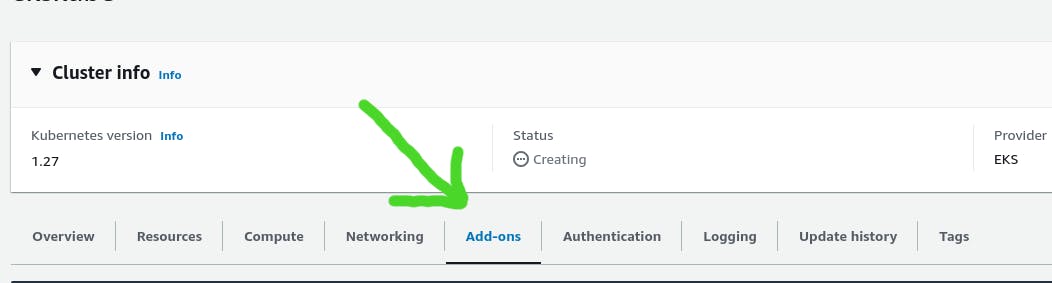
You should see three add-ons that come by default with our cluster. Click on "Get more add-ons"
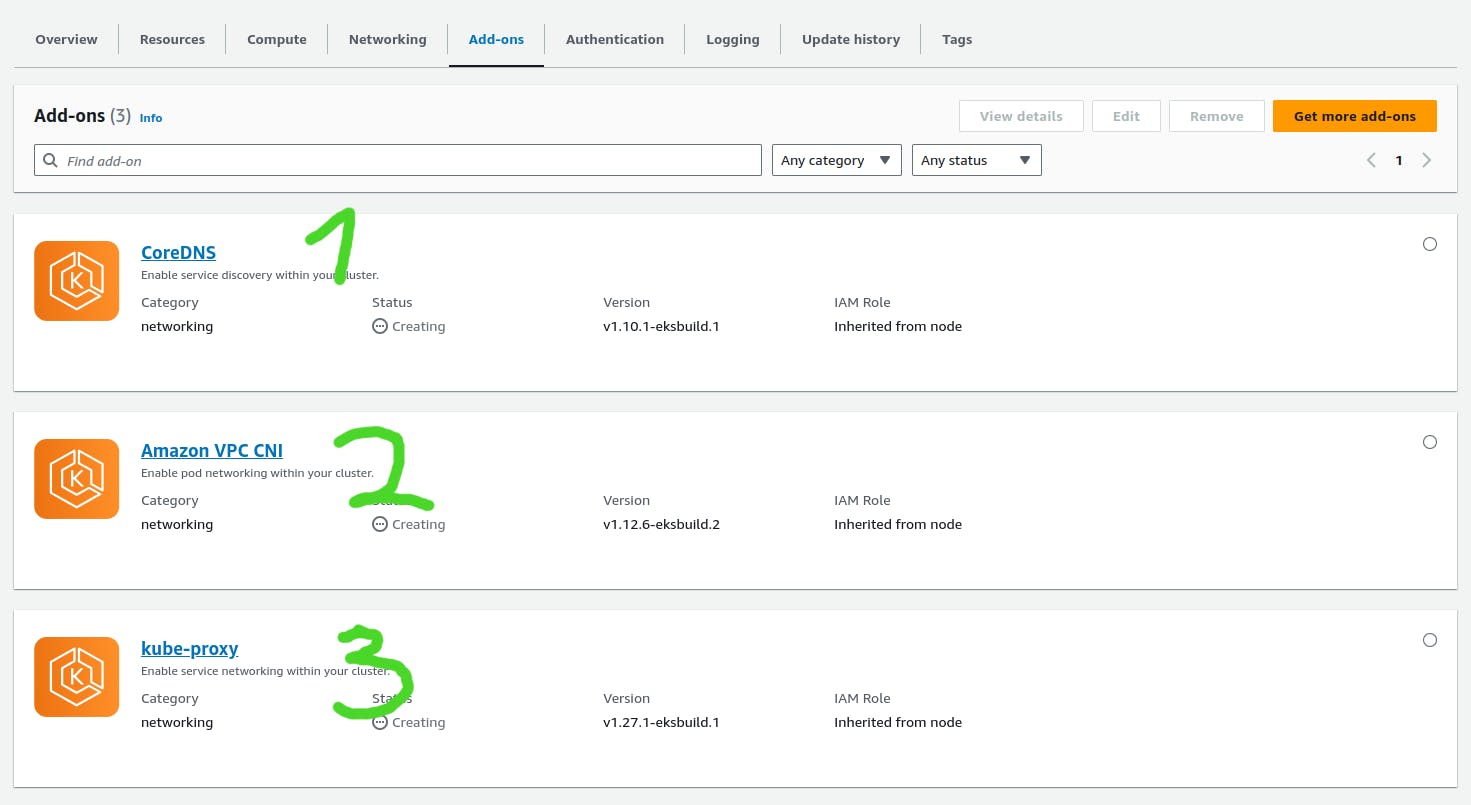
Now select Amazon EBS CSI driver and create it.
Create Node Group
The node group consists of EC2 instances that will be running our container workloads. In the EKS dashboard, navigate to the compute area and create a nodegroup.
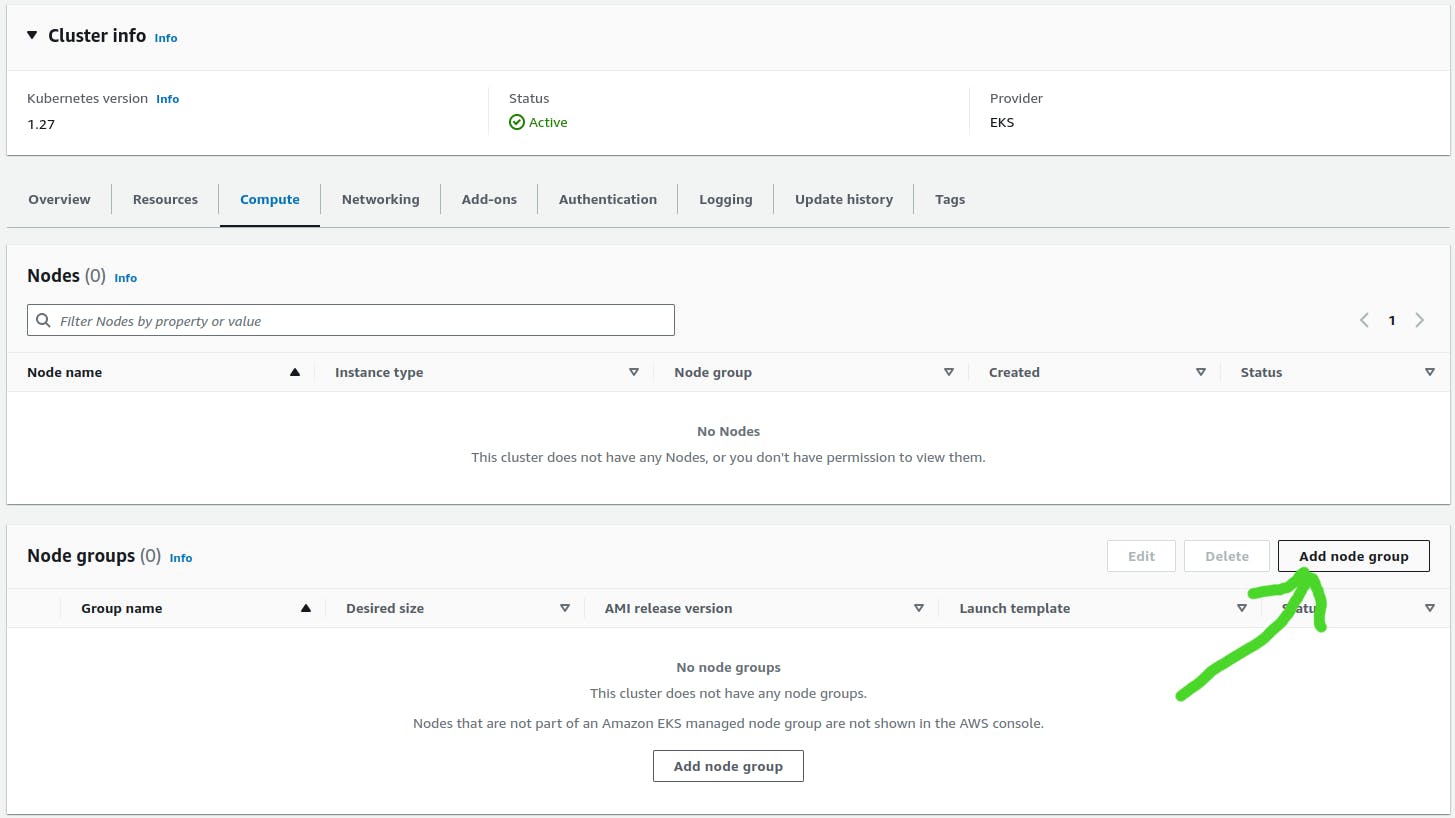
When creating the nodegroup, you have to select the EKS nodegroup role we created earlier.
Add EKS Cluster to kubectl context
To run commands against your EKS cluster, you have to add the cluster to your kubectl context. Use the follwing command will do so:
aws eks update-kubeconfig --name {eks_cluster_name} --region {aws_region}
This command uses the AWS CLI to automatically set up the context for you. In the command, you have to replace {eks_cluster_name} with name of your EKS cluster and {aws_region} with the region you deployed the cluster to. e.g us-east-1.
Use this command to test if you can access your cluster.
kubectl get nodes
If you don't get any errors, then you are all set to go.
Download the Kubernetes Manifest Files
You can get the manifest files from my github repository: https://github.com/ajimbong/k8s-aws-beginner-project.git
or use this git command to clone the repository to your pc:
git clone https://github.com/ajimbong/k8s-aws-beginner-project.git
Once you clone the repository, open the folder in your text editor of choice.
Setup the MongoDB Database
Open a terminal in the project folder and run the following command to setup the database pods:
kubectl apply -f mongo-statefulset.yaml
setup the service
kubectl apply -f mongo-service.yaml
Initialize the MongoDB replica set on the mongo-0 pod. Make sure you wait for this command to finish running
cat << EOF | kubectl exec -it mongo-0 -- mongo
rs.initiate();
sleep(2000);
rs.add("mongo-1.mongo:27017");
sleep(2000);
rs.add("mongo-2.mongo:27017");
sleep(2000);
cfg = rs.conf();
cfg.members[0].host = "mongo-0.mongo:27017"; rs.reconfig(cfg, {force: true});
sleep(5000);
EOF
Run this command to confirm everything is okay
kubectl exec -it mongo-0 -- mongo --eval "rs.status()" | grep "PRIMARY\|SECONDARY"
Now lets populate the database with demo data
cat << EOF | kubectl exec -it mongo-0 -- mongo
use langdb;
db.languages.insert({"name" : "csharp", "codedetail" : { "usecase" : "system, web, server-side", "rank" : 5, "compiled" : false, "homepage" : "https://dotnet.microsoft.com/learn/csharp", "download" : "https://dotnet.microsoft.com/download/", "votes" : 0}}); db.languages.insert({"name" : "python", "codedetail" : { "usecase" : "system, web, server-side", "rank" : 3, "script" : false, "homepage" : "https://www.python.org/", "download" : "https://www.python.org/downloads/", "votes" : 0}}); db.languages.insert({"name" : "javascript", "codedetail" : { "usecase" : "web, client-side", "rank" : 7, "script" : false, "homepage" : "https://en.wikipedia.org/wiki/JavaScript", "download" : "n/a", "votes" : 0}}); db.languages.insert({"name" : "go", "codedetail" : { "usecase" : "system, web, server-side", "rank" : 12, "compiled" : true, "homepage" : "https://golang.org", "download" : "https://golang.org/dl/", "votes" : 0}}); db.languages.insert({"name" : "java", "codedetail" : { "usecase" : "system, web, server-side", "rank" : 1, "compiled" : true, "homepage" : "https://www.java.com/en/", "download" : "https://www.java.com/en/download/", "votes" : 0}}); db.languages.insert({"name" : "nodejs", "codedetail" : { "usecase" : "system, web, server-side", "rank" : 20, "script" : false, "homepage" : "https://nodejs.org/en/", "download" : "https://nodejs.org/en/download/", "votes" : 0}});

db.languages.find().pretty();
EOF
Create the MongoDB secret
kubectl apply -f mongo-secret.yaml
Setting up the API
Create the API deployment
kubectl apply -f api-deployment.yaml
Expose the Deployment through the service
kubectl expose deploy api \
--name=api \
--type=LoadBalancer \
--port=80 \
--target-port=8080
Set the environment variables
{
API_ELB_PUBLIC_FQDN=$(kubectl get svc api -ojsonpath="
{.status.loadBalancer.ingress[0].hostname}")
until nslookup $API_ELB_PUBLIC_FQDN >/dev/null 2>&1; do sleep 2 && echo waiting for DNS to propagate...; done
curl $API_ELB_PUBLIC_FQDN/ok
echo
}
Test and to see if the Service is accessible
curl -s $API_ELB_PUBLIC_FQDN/languages | jq .
curl -s $API_ELB_PUBLIC_FQDN/languages/go | jq .
curl -s $API_ELB_PUBLIC_FQDN/languages/java | jq .
curl -s $API_ELB_PUBLIC_FQDN/languages/nodejs | jq .
{
API_ELB_PUBLIC_FQDN=$(kubectl get svc api -ojsonpath="
{.status.loadBalancer.ingress[0].hostname}")
echo API_ELB_PUBLIC_FQDN=$API_ELB_PUBLIC_FQDN
}
Setting Up the Front End
Apply the front end deployment
kubectl apply -f frontend-deployment.yaml
Create the front end service
kubectl expose deploy frontend \
--name=frontend \
--type=LoadBalancer \
--port=80 \
--target-port=8080
Confirm that the front end can receiver requests
{
FRONTEND_ELB_PUBLIC_FQDN=$(kubectl get svc frontend -ojsonpath=
"{.status.loadBalancer.ingress[0].hostname}")
until nslookup $FRONTEND_ELB_PUBLIC_FQDN >/dev/null 2>&1; do sleep 2 && echo waiting for DNS to propagate...; done
curl -I $FRONTEND_ELB_PUBLIC_FQDN
}
Test Your Deployement
Run this command to get the public URL for your voting app
echo http://$FRONTEND_ELB_PUBLIC_FQDN
Open the link in your browser and if you see a page like this, that means your deployment was successful.
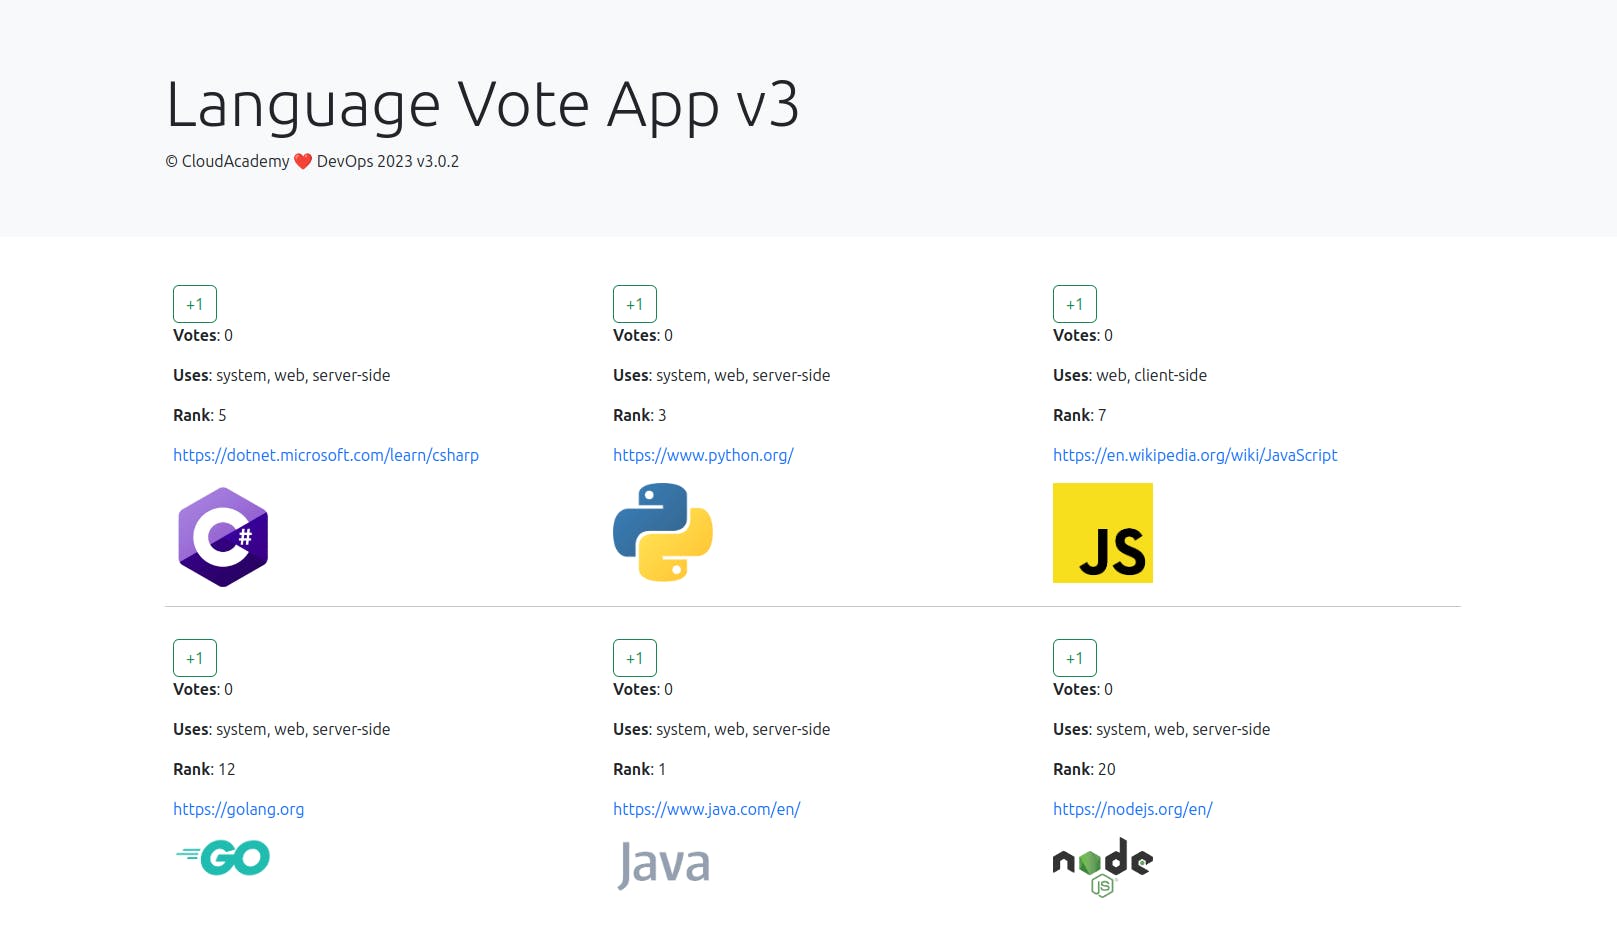
You can go ahead and start voting for your favorite programming langauge and once you're done, make sure you delete all your kubernetes resources i.e the nodegroup and cluster because you will get charged for that.
Summary
In this project, we learned how to deploy a containerized application on Amazon EKS using kubctl and the AWS console. If you followed along, I hope you were able to get your deployment running successfully and learned a lot in process. Feel free to leave a comment if you have any questions or feedback.
{{ I noticed some errors in this article which I have to rectify in the future }}