

Deploying a Dynamic WordPress Application on AWS Three-Tier Architecture


Brief
This guide will walk through the steps in deploying a dynamic WordPress application on AWS using a three-tier architecture. The process will involve creating:
A VPC and configuring it.
A database for the WordPress website
An Elastic File System to store our WordPress files
Application Load Balancer and EC2 instances to serve the WordPress application
Registering a domain name and generating an SSL certificate for secure communication
I implemented this project by following a YouTube series which you can check out here: https://www.youtube.com/watch?v=63jObzufz9Q&list=PL184oVW5ERMBkf9lhOylB_OzC8Ez9ty2Q&pp=iAQB
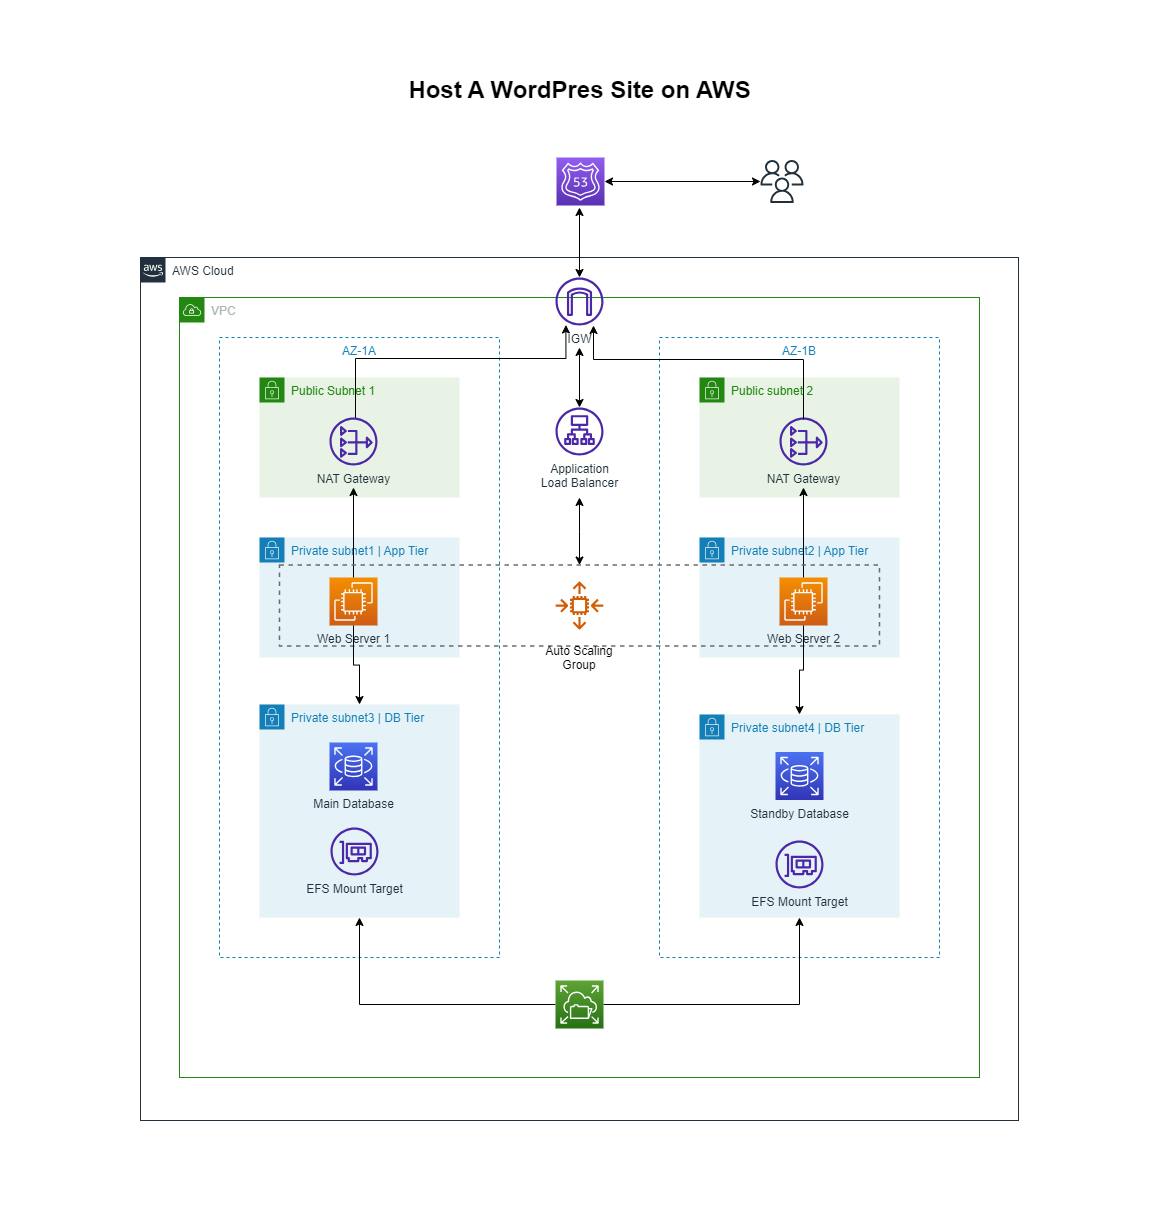
Here is the reference architecture diagram for this project:
Procedure
1) Setting Up and Configuring the VPC
Create a custom VPC in any region and assign it a CIDR block of your choice. Six subnets are to be created in total which will be distributed across two Availability Zones(AZ) for high availability. Each AZ should have:
A Public subnet layer.
A private subnet for the app tier.
And a private subnet for the database tier.
Once this is done, create an Internet Gateway(IGW) and attach it to the VPC, so that we can access our application over the Internet once it is deployed.
Two NAT gateways should be created and placed in each public subnet. This will allow our instances in the private subnets to access the internet for package installation and updates without making them public.
The next step is to create route tables for data to flow effectively within and out of the VPC. The two public subnets can share the same route table which should have a route to the Internet Gateway. One route table will also be shared by the Application and Database Tier in the first availability zone which should have a route to the NAT gateway in that particular AZ. And the same process can be followed for creating the other route table in the second AZ.
Finally, we have to create a Security Group(SG) for the Application Load Balancer(ALB), Web Servers, Database, and Elastic File System(EFS) following these guidelines:
The ALB SG has two inbound rules for
HTTPandHTTPS, and accepts traffic from anywhere.The Web Server SG has two inbound rules for
HTTPandHTTPSbut will only accept traffic from the ALB SG.The database SG has an inbound rule for
MySQL/Auroraand only accepts traffic from the Web Server SGThe EFS SG has inbound traffic for
NFSand only accepts traffic from the Web Server SG.
2) Provisioning the RDS MySQL database
To create the database, we first need to create the subnet group in the RDS console. When creating the subnet group, select the VPC that was created earlier and the subnets.
Now create the database by selecting the following options
Engine Type: MySQL
Templates: Free Tier
Instance Identifier: wordpressdb
Username: admin
Password: {provide your password}
Subnet Group: {select the subnet group that was created earlier}
Security Group: {select the EFS SG that was created earlier}
Initial database name: WordPress
We can leave the rest as default and proceed to create the database.
3) Creating an Elastic File System
On the AWS console, search EFS and proceed to create an Elastic File System. In the wizard, select the VPC we created earlier and in the mount targets, select the two private subnets in the database tier. Every other thing can be left as default.
4) Configure WordPress installation
In this step, we have to create a public EC2 instance which we will use to configure the WordPress installation on the EFS and RDS instances. When creating this instance, make sure it is in the public subnet and should have all the security groups(ALB, Web Server, EFS, RDS) and also a custom SG that will permit us to SSH into the instance and configure it.
This is the script that will be used for this setup
#Switch to root user
sudo su

#update System packages
yum update -y

#Install Apache Web Server
yum install -y httpd

#Install PHP interpreter
yum install php php8.1-mysqlnd.x86_64 -y

#Create and mount EFS to /var/www/html directory
#This mount command will be different for you
#You have to yours from the EFS dashboard making sure
#The last part of the command ends with /var/www/html
mkdir -p /var/www/html
sudo mount -t nfs4 -o {your efs mount command} /var/www/html

#Get WordPress files
cd /var/www/html
wget https://wordpress.org/latest.zip
unzip latest.zip
rm -rf latest.zip
cp -r wordpress/* /var/www/html
rm -rf wordpress/

#configure wordpress installation
cp /var/www/html/wp-config-sample.php /var/www/html/wp-config.php
#edit this file and provide details for your RDS database
nano /var/www/html/wp-config.php

#start Apacher server
systemctl enable httpd
systemctl start httpd
5) Create Web Servers
The next step is to create two web servers in the application tier private subnets and provide them with the Web Server Security Group. We will also use the user data below to bootstrap our instances.
#!/bin/bash

sudo su
yum update -y
yum install -y httpd
yum install php php8.1-mysqlnd.x86_64 -y
sudo mount -t nfs4 -o {your efs mount command} /var/www/html
systemctl enable httpd
systemctl start httpd
Make sure you modify the command used to mount the file system.
6) Create an Application Load Balancer
To create the Application load balancer, we need to, first of all, create a target group that will contain both of our Web Servers. Then we should be able to create the load balancer in the public subnets and select the target group.
To test if everything is working well, we can copy the DNS name of the ALB and load it in a new browser tab. If we don't see any errors, that means everything went successfully.
7) Register Domain Name and Generate SSL certificate
Use Router53 to buy a custom domain name for your WordPress application. In your hosted zone, add an alias record that points to your Applications Load Balancer.
Navigate to AWS Certificate Manager and generate an SSL Certificate for your particular domain name.
To make sure your ALB accepts HTTPS traffic, you need to add an HTTPS listener to your application load balancer.